Showing posts with label college students. Show all posts

Monday, October 1, 2012

Helpful Tips for College Students to Save Money!!


As many of my fellow college students all know, we are BROKE and whatever money we DO get is usually spent on fast food, Starbucks...and the club. Lol Granted, saving money is definitely not a DIFFICULT task, sometimes when you have it at your disposal, you're inclined to spend it. I've found myself in so many predicaments where I would actually NEED to get something, but not have the money because I spent it on Chinese the night before [WOMP] 
That feeling genuinely SUCKS.
Consequently, I've found a few good ways to help myself save a little bit of money when it comes to my  expenses and I live by these 3 rules:
  • DON'T buy it if you don't NEED it. (especially if it's not on sale)
  • See what's on sale in weekly circulars
  • ALWAYS, ALWAYS, ALWAYS take advantage of printable coupons!
  • If something you buy is not to par, NEVER hesitate to write the company an e-mail.
DON'T buy it if you don't NEED it!
Common freakin sense, right?? But you know, sometimes you're in the store and you're like, "I waaaant..." NO! Don't give in!! If it's not on sale, it's just not worth it until it is. It helps to make a list of everything you need before you go shopping to have a general idea of where you need to go in the store. The list helps you to remain focused and to avoid wasting money on things that you don't even need. Keep yourself focused on the necessities, everything else can definitely wait.


See what's on sale in the weekly circulars
I never go into the store without checking their website for their weekly circular first. I like to see if what I need is on sale yet, but if not and they aren't showing anything I'm generally interested in, then I just don't go to the store...I try to keep myself away from the temptation of grocery shopping. lol. Now, I'm pretty sure every grocery, pharmacy and variety store (Walmart, Target, etc..) has their circular on their website and if not, then suggest that they do! They love customer feedback!

-------> ALWAYS take advantage of printable coupons!!! <-------
I LOVE, LOVE, LOOOOVE coupons!!! SO  what I did was set a separate email account just for my coupons and manufacturer ads to be sent to (ex: yourname_coupons@yahoo.com). I went to manufacturer websites ( ex: Kellogg's, Dove, etc...) and signed up for their emails. They usually have monthly coupons that they send to their subscribers. In addition to that, I signed up for Coupons.com, CouponNetwork.com, and RedPlum.com which are all LEGIT printable coupon websites. I advise that you pay attention to the quantities of what the coupon is for. For example, you see a coupon that say SAVE $1.50- Poptarts! And then underneath it, it'll say when you purchase 3 or more boxes -__-. Yeah. Look out for those. Also, some additional couponing websites that are really good are:
  • iHeartTheMart - focuses on what sales and coupons are going on Walmart, exclusively.
  • TotallyTarget.com- focuses on what sales and coupons are going on in Target, exclusively. Also features other great online deals!!
(I suggest yall give these two^ a- go if nothing else!) 
 
NEVER hesitate to email the company [and complain]
Say something you brought was stale, broken or just wasn't as good as you expected it to be..DO NOT, and I repeat, DO NOT hesitate to go to that company's website and tell them about it! Like I've said before, they love customer feedback! One thing NO company wants to do is lose customers under any circumstance, so you know what they'll do? Compensate you, USUALLY with vouchers for free products or coupons! I just had an unfortunate run-in w/ some mold in some frozen vegetables (eww, right?) so I took a picture of it and the UPC code on the back of it and sent the company a nice little email about my disgust and I just got my vouchers today..3 of them for free products. I once had another unfortunate issue with some deodorant that I had purchased,  and I did the same exact thing and got 2 free deodorant vouchers. I'm not makin this stuff up!! Now, I'm NOT telling you to go lie to the company about your experiences with their products, but I AM advising that if you DO, that you tell them about it. They love to make their customers happy!
 
Just by following those 4 little rules I've set for myself, I find myself saving more and more money while also being able to realize that I really don't NEED all the things I want- I can definitely live without them, in fact. 
 
But the main point of this post is to just help you guys make yourselves conscious of the fact that there are savings right at your fingertips, you just have to learn how to sort through them and decide if it's actually needed! Self discipline also plays an important role in all of this. 
Remember: if you don't NEED it, DON'T buy it.


STAY BLESSED!
=)

Wednesday, September 5, 2012

College Move-In/ DNC Rambling


I have OFFICIALLY moved back to Charlotte for school! Am I excited?? Ehhhhhh...
I love the layout of my new dorm though! 
Everyone has their OWN bedroom, Praise GOD.
There are 2 bathrooms! (2 ppl per bathroom) Thank you Jesus.
Kitchen, living room, AND we have a washer and dryer.
Amen.

The DNC has Charlotte on LOCK though. The day that I moved in (Saturday) there were police EVERYWHERE. They have them walking the streets in groups, the police were escorting buses past the stadium checking them to make sure there are no bombs on them, they aren't playing ANY GAMES. Consequently, I'm not in Charlotte at the moment; I'm currently visiting the boyfriend and the in-laws. I know yall are thinking, "WHAT IS WRONG WIT YOU?! WHY WOULD YOU NOT WANNA BE DOWN THERE DURING THIS TIME?!" I do.
 But in all honesty, I'm not in to politics. I WILL vote [for Obama] but as for all the rallies and parades and stuff? *shakes head* 


*bows down to her arms*
I watched our first lady's speech last night and damn near CRIED. Hahaha! Everything she said about living the "American Dream" and knowing what it's like to be in a position that many of us are in at this moment is true. And it's comforting to know that we have people in office that actually KNOW what it's like to grow up middle-lower middle class because they know what we're dealing with. 
What blew my mind was her hair though, cause it was killing me softly, on some real stuff. Her hair was ON. POINT. She is so elegant; it makes me wonder why girls/women don't look up to her more. 
 Can we get a round of applause for her arms & body though?? *standing ovation*
Baddest first lady in the game!

Anywhooz...

This is an age where women can sit down and give you a play by play on Love and Hip-Hop and Honey Boo Boo, but don't even know that the DNC is happening, or even WHAT the DNC is! It's sad to think that girls would more quickly look up to Nicki Minaj than to Gabrielle Douglass...it's disgusting, actually.
One day, I was in Walmart checking out and my niece (she's 12) saw a magazine with one of the chicks from 16 and Pregnant on it and was like, "Ooo!" And you know I picked up the one with my girl Gabby Douglass on the cover and I was like, "Yo, this girl is my idol!" and my niece was like, 
*sucks teeth* "Ain't nobody worried about her"
I said, "What the hell did you just say??" LMAO. I was mad offended, but anyway...

As a people, we REALLY need to get it together. There are people setting these ridiculous examples of what women and girls should be/act like and they're actually feeding into it! Nicki Minaj, Rihanna, the chicks on 16 & Pregnant, Bad Girls Club, Love & Hip-Hop to name a few...they're portraying images that makes me worry about what these girls midsets are. All this fighting, being slutty, getting pregnant...NONE of these are mistakes anymore! Girls are losing their virginity younger and younger..and it's NOT because they aren't being given "the talk" because, "the talk" is basically everywhere you LOOK. Every Trey Songz music video is the damn "talk!" What girls nowadays need are positive role models to look up to, and if you're allowing your kid to look up to Nicki Minaj and the chicks on the Bad Girls Club..then maybe you need to evaluate yourself as well.
*shrugs*

HAPPY LIVING!

Tuesday, August 28, 2012

Yum Yums: Quick and Easy Veggie Fritatta


One of my best friends and my niece were staying at my house and I was running out of breakfast ideas, FAST. I had just gone produce shopping the day before so my fridge was STOCKED with vegetables for me to use. We had a dozen and a half carton of eggs and some cheese, so I decided to make a fritatta! Now, I've never made a fritatta...but I DO believe that this came out freakin AMAZING. I honestly wished that I had made another one.

 For this recipe, you don't HAVE to use fresh vegetables. I know how difficult it is to find produce at reasonable prices, ESPECIALLY when you're on a budget. Frozen vegetables will do just fine, but one thing I'll recommend is after sauteing is to pour out any extra liquid they may extract. 
You can use anything you want in your fritatta, the possibilities are practically ENDLESS.
Don't get TOO crazy w/ the creativity and start throwin uncooked rice and oatmeal and stuff in there cause uhhhh...ew.

One thing I was thinking about, for us busy [college] folk, would be to make this sometime on Sunday, let it cool, cut it and place it in either individual Ziplocs or small Tupperware containers and freezing them so that when you're in a rush, or on the go in the morning, you can just heat up a slice in the microwave and be on your way!


Veggie Fritatta
Serves 3-6
Prep Time: 10-15 mins
Cook Time: 10-15 mins

1/4 of a large Onion, small dice
4 cloves of Garlic, minced
3 c. Fresh Spinach, washed, sauteed and chopped
2 c. Fresh Broccoli Florets, washed and blanched
1 Red Bell Pepper, small dice
2 Fresh Basil Leaves, chiffonade
1/4 tsp Red Pepper flakes
2 tbsp Canola Oil
5 Eggs, beaten 
1/2 tsp Ground Cayenne Pepper
Salt and pepper to taste
3 slices of tomato
1/2 c. shredded Monterey Jack Cheese

Preheat broiler on High

  1. Heat a medium sized iron cast skillet over medium heat, add oil. Add vegetables and red pepper flakes and saute' until broccoli is fully cooked.
  2. Add the cayenne pepper, salt, and pepper to your eggs and whisk until fully incorporated. Add eggs to the skillet and allow it to cook for about 2 mins, or until it is halfway done.
  3. Place the tomato slices on top, and then sprinkle the cheese over the entire fritatta.
  4. Place fritatta in the oven and bake until cheese is melted.
  5. Remove from the oven and enjoy!
*IF YOU DO NOT HAVE A BROIL SETTING IN YOUR OVEN: Right after you place your eggs in the pan, add the tomatoes and cheese and bake in the oven at 350 F for 5 mins, or until egg is cooked.

HAPPY EATING! =D


Monday, August 27, 2012

Yum Yums: Chicken Fricassee


So I decided to try out this Chicken Fricassee I saw on this blog that I follow called Nibble Me This and it came out BANGIN!!
Check him out, he has some pretty good recipes! 

I did change a few things in terms of preparation and ingredients, so you can look and compare and choose which one you wish to follow!

5 Chicken leg quarters, separated ( will result in 5 legs and 5 thighs)
1 tbsp Kosher Salt
1/2 tbsp Black Pepper
1 tbsp Onion Powder
1/2 tbsp Cayenne Pepper
2 tbsp Canola/ Vegetable Oil

1 Can Chicken Broth
2 c. Vegetable Broth
1 head of Garlic, minced
1/2 onion, small dice
1 red bell pepper, small dice
3 slices of bread, cubed ( I honestly just used some hot dog rolls since we didn't have any bread.)
3 leave Fresh Basil, rough chop
1 tsp Fresh Rosemary, rough chop
1/2 tsp Fresh Thyme, rough chop
1 tsp Red Pepper Flakes
1/2 c. cream
Salt and pepper to taste.

Preheat oven 350 F

  1. Rinse off the legs & thighs and pat dry. Season thoroughly with salt, pepper, onion powder and cayenne pepper. 
  2. Heat oil in a large skillet over medium-high heat (if the oil is smoking, it's too hot). Making sure the skin is fully covering the meat, place about 3 pieces of chicken in the pan to sear at a time. Make sure that you hear a loud sizzle when you place the pieces in because you want to form a nice brown color on the skin. Sear the chicken on each side an set aside on a sheet tray lined with a sheet rack. 
  3. Once all chicken is seared, finish in oven for about 10-15mins or until thigh reads 165F.
  4. In the same pan, on medium heat, saute onions, garlic and pepper for about 2 mins. Stir in the bread until it is all generously covered in oil/fat. Add chicken broth and, using a whisk or wooden spoon, scrape of the bottom of the pan to lift off the fond- little brown bits stuck to the bottom of the pan from searing. Bring to a boil and reduce to a simmer. 
  5. Whisk the mixture so that the bread breaks up, but leaves no visible lumps. Add the veg stock and allow it to simmer until it's thickened. Once thickened, after about 5 mins,  stir in basil, rosemary, thyme, red pepper flakes and cream. 
  6. Taste your sauce, and adjust seasonings to your liking.
  7. Add all chicken back to the pan and allow to simmer for another 3 mins.
  8. ENJOY!
I hope you guys enjoy this recipe as much as I did! I was surprised at how unbelievably delicious this was...just thinking about it has me starving! 

HAPPY EATING!


FIT: My body as of 8/27/2012


BUST: 34 1/2"
WAIST: 28"
HIPS: 39"
WEIGHT: 143.3lbs


 My goal to maintain has been successful!!
I lost some hips though...no bueno. =, / 
..but at least my abs are rockin ;)

My diet has been mostly the same...with the addition of some occasional cheats. 
I still basically eat everything I want to, I just incorporate more vegetables and fruits into my day. I don't drink soda, AT ALL. I don't eat fast food, except the occasional Wendy's, Chic-fil-a or Subway.

When I make my plate, half of the plate is vegetables, 1/4 starch and 1/4 meat. 
I also eat all of my vegetables before I move on to the starch and protein.
I incorporate fruits and vegetables in to EVERY meal, including breakfast. I recently made a Veggie Fritatta that was freakin delicious! I plan on having that recipe to you guys soon.

 Making sure I eat a variety of fruits and vegetables has been helpful in terms of digestive health & bathroom-going. [T.M.I?]

My next diet goal is giving up white breads/ pastas, gearing towards more whole grain choices. I also plan on giving up refined sugar and flour. 
Wish me [add my wallet] luck!!


HAPPY HEALTH!!!

Don't have a gym near you?? No problem!

Away from school I have NO access to a gym, so the fact that these workouts are so readily available on FB makes life SO much easier. I was really worried about gaining all of my weight back over the summer, but I've been able to maintain doing these in conjunction with the daily workouts I've previously posted.

This first workout kicks my freakin BUTT. 
By the 3rd set, I'm usually like FORGET THIS!! 

But then I think about my goal of maintaining a healthy lifestyle and I continue to push myself. I find that stretching in between sets makes it a little easier to bear and helps to reduce sore muscles the next day. 


This next one isn't really a workout, just a series of moves you can add to any workout you're doing. I usually do 3 reps of each. I add these moves to the Monday and Thursday workouts.


This last one is my absolute favorite cause it's such a challenge! I usually do it when I'm watching Dr.Oz...lol. I've been able to complete it before the show comes back, but when I first started doin it, it was definitely a challenge! I encourage all of you to attempt this, you'll find that it actually isn't hard at all! How to do a burpee
How to do a Russian Twist 


HAPPY HEALTH!

Thursday, August 23, 2012

Yum Yums: Spinach Ravioli + Turkey Sausage w/ Garlic Basil Sauce

As aforementioned in my Wash Day Rambling post, my humungo Spinach raviolis were made but had not yet been cooked for human consumption.
Well, I'm here to tell you that they HAVE been cooked, and were pretty freakin tasty too ;)
This inclination to make ravioli came about after I had bought a bag of spinach & was running out of ideas of what to make. I used it in omelets and rice, served it on the side or in salad but i wanted to do something different! Since I bought those won ton wrappers and saw that I was gonna be able to make ravioli w/ them, it was over. Spinach ravioli HAD to be made!0_0

This is another one of my simple recipes that can easily be cooked by anybody who may know their way around the kitchen a lil bit..but if not, I hope I make it easy enough to follow!! These can be made to be used the same day, or be frozen for future use, like I did. If you DO decide to freeze them, make sure you freeze them on a flat surface like so ---->>
BEFORE you put them into a container to freeze because if you don't they will all stick together and create a horrible mess and all of your hard work will be ruined..and you don't want that, do you? No. Didn't think so.

Here it goes...

Spinach Ravioli
Yield: 3-5
1/2 pack Nasoya Won Ton wrappers ( I got them from Shop Rite for like..$3)
4 c. Fresh Spinach, washed & drained
1 tbsp. Garlic, minced
2 c. Ricotta cheese
1 Egg, beaten
1 c. Parmesan cheese
2 tbsp Salt
1tbsp Pepper
1/4 tsp Nutmeg

1 egg + 1 c. water for egg wash.
1/4 c. flour for tray
  1. Separate out the won ton wrappers, discarding the torn ones. I used 30.
  2. In a pot of boiling, salted water, blanch your spinach until wilted, strain, and then place the spinach into a bowl of ice & water to stop it from cooking any further.
  3. Remove the spinach from the water and wring as much of the water out of it as you can. *This process is done easiest with cheesecloth, but if you do not have any on hand, fold the spinach up in 2 coffee filters, 2 paper towels, and an old, CLEAN wash rag, [preferably one you don't care for too much] and wring it out. 
  4. Remove the spinach from the cloth and give it a rough chop.
  5. Combine spinach w/ egg, ricotta, Parmesan, salt, pepper and nutmeg and stir until fully distributed.
  6. Wrap either a sheet tray, cookie sheet, or regular food tray in foil and spread flour onto the tray evenly. Lay out your won ton wrappers in 2-4 rows (depending on how big your cookie sheet/ tray is) and using a spoon, scoop a quarter-sized amount of filling and place it in the center of every other won ton wrapper.
  7. Using either a brush or your finger, brush the egg wash onto the outer sides of the won ton wrapper, around the spot where you placed the filling.
  8. Take the won ton wrappers that do not have any filling on them, and place over thee ones that do. In order to seal it, press your fingers around, not on, the area where the filling is and gently push outward, towards the edge of the ravioli. This will help push out any excess egg wash and remove any air bubbles. Repeat with all ravioli.
  9. If freezing for later enjoyment, keep on tray and freeze. Once fully frozen, place into Tupperware and return to freezer. 
  10. If you can't wait to eat them, get a pot of boiling, salted water ready, drop a few of your ravioli in and cook until they begin to float, remove and serve with the sauce of your liking.
  11. ENJOY!


Turkey Sausage w/ Garlic Basil Sauce
1/2 link Turkey Kielbasa,cut into 1/4in thick pieces
2 tbsp Garlic, minced
3 tbsp butter
3 tbsp flour
1/4 c. White Cooking Wine
1/2c. Veg stock
6 Basil leaves, chiffonade
Salt & Pepper to taste

  1. Heat pan over medium heat. 
  2. Add sausage and sear on all sides until brown, but not burnt. 
  3. Stir in garlic and saute for 1 min.
  4. Turn up heat, add butter until fully melted and then stir in flour. Cook for another minute or so- be careful not to burn.
  5. Add wine and stir/whisk. The pan should sizzle alot when you do this, don't be afraid cause that's what you want. Cook for 2 mins or until the alcohol is cooked out.
  6. Add stock and bring to a simmer.
  7. Stir in basil and season with salt and pepper
  8. Serve over ravioli
  9. ENJOY!


The sauce didn't look how I wanted it to but...it was still good!!!

Yum Yums: Simple, Easy, YUMMY, Carrot Soup!!

Yes. It is finally here folks...
Soup? In the summer?? WHY?

 Wellllll....


...we had alot of carrots in the fridge and I REALLY needed a reason to use my new immersion blender that I got for my birthday..


(it's sexy, right? ;) ) --->>

..so I was like, TA-DA! Carrot Soup!
Yeah, if only it were that simple.
I even got all fancy and made my own whipped cream [only cause the blender came with a whisk attachment] to put on top to create another layer of richness and flavor....mmmmm NOM.
*drools*
Sorry...

This recipe is freakin simple, it's ridiculous. I think I even forgot that it was on the stove for a second until I got a whiff of cinnamon in the air (Cinnamon? Yeah.)

Alright lovies, here it is!!

Kayla's Slam-Bam-Jammin Carrot Soup! <--- (I don't really call it that)
Yields: 6 servings

1 bag of Carrots, about 7-8 medium sized carrots total, medium dice
1 Onion, medium dice
3 cloves, Garlic, chopped
1 tbsp Canola Oil
2 tbsp fresh Ginger, either chopped or micro-planed/grated
1 tsp fresh Rosemary, chopped
1 tsp fresh Sage, Chopped
7 oz. Vegetable Stock
1 can Coconut Milk
1 tsp  ground Cinnamon
1/4 tsp ground Nutmeg
Salt & Pepper to taste

  1. Preheat pot over medium heat, add oil and saute carrots, onions and garlic together for about 2 mins or until onions begin to turn translucent. 
  2. Stir in ginger, rosemary and sage and continue to cook for another minute.
  3. Add vegetable stock, bring to a boil and then reduce to a simmer. Cook until the carrots have cooked all the way through. 
  4. Turn off the fire, grab a potholder and prop the pot up using one hand*. Using the immersion blender, blend everything in the pot until no lumps remain. 
-OR-
If you do not have an immersion blender, use a regular blender or food processor, but DO NOT try to blend everything at once. Blend your soup in batches when using a regular blender/ food processor and DO NOT fill them all the way to the top. Once you've finished blending, return to the pot.

5. Bring to a simmer and gradually add coconut milk. If the soup is more thick than you'd like, feel free to add additional milk, cream, stock or water- whatever you prefer. I chose to thin it out with some more stock so that i wouldn't lose flavor. 
6. Stir in cinnamon and nutmeg and season with your favorable amount of salt and pepper.
7. ENJOY!


*The reason you want to prop/ hold one side of the pot up with your hand before you use the immersion blender is to avoid splatters, and to allow easier blending. 
This soup lasted me a week in the fridge, but it can also be frozen and reheated for whenever you want. Another plus to this is that it can also be enjoyed cold, so choose your preference and dig in!!

P.S. To make the whipped cream, get some heavy cream, salt and chopped ginger, place in blender (or use whisk attachment on immersion blender ;) ) and whip until stiff peaks are reached. Don't over whip it though, you don't wanna make butter! (or do you....?)


I just garnished with some scallions and julienned carrots that i roasted in the oven for about 5 mins. 

Tuesday, August 14, 2012

Thursday, August 9, 2012

Yum Yums: Indian Spiced Roasted Chicken

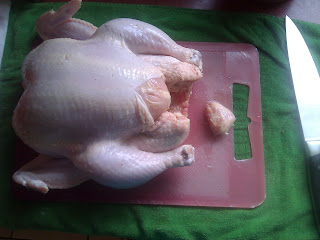
Remember that oh, so BEAUTIFUL chicken I bought for $4 a couple of months ago??
 Yeah. I did something special with that bad boy! 
This recipe is type long in terms of ingredients, but not difficult at all! 
I did this recipe for my practical exam and freakin blew my chef AWAY. 
Yeah, ya girl knows her way around the kitchen..;)


WHAT YOU'LL NEED:
1 3-4lb Whole chicken

Rub:
2 tbsp Ground Cumin
1 tbsp Ground Coriander
2 tbsp Ground black pepper
1/4 tsp Grated Nutmeg
1/2 tsp Dry Mustard
1 1/2 tbsp Ground Cinnamon
1 tsp Ground Ginger
1 tsp Turmeric
1 tbsp Paprika
2 tbsp Kosher Salt
4 tbsp unsalted butter, room temp

2 Spanish [yellow] Onions
2 Garlic Heads + 2 cloves
3 Carrots
2 Celery Stalks

Stuffing:
1 Piece of ginger about the length of your thumb
1 sprig of parsley
1 sprig of thyme
1 bay leaf
1 tsp Peppercorns

Make sure you place your vegetables so that the chicken elevated evenly.


The first thing you want to do is get your vegetables ready. This array of vegetables is known as mirepoix, which  is the combination of celery, carrots and aromatics to provide flavor and aroma. Mirepoix can also be used to elevate a roast during roasting and also provides additional flavor to the pan drippings to later make a sauce for your roast.


1. Rinse off your celery; cut the tops and ends off of your celery stalks and cut the stalks into 3 pieces.
2. Peel your carrots; cut off the tops and ends and cut the carrots into 3 pieces.
3. Cut the whole garlic head in half, the way you would cut a grapefruit.
4. Cut the onions in half, discard the outer layer, and cut the halves in half.
5. Set aside in roasting pan

You don't want the vegetables cut too small because you don't want them to burn while the chicken is cooking on top of them.


  • Next, I got the aromatics I planned on stuffing inside of the bird (Parsley, thyme, Bay leaf, ginger, garlic, peppercorns) prepped and set aside. I didn't chop anything up except for the ginger, which i cut into 3 pieces. 


  • Combine all of your dry ingredients with butter and mix together until fully incorporated.


Now it's time to prep the bird!!
If you've never worked with a whole chicken, don't be intimidated, it's not difficult at all.


  • Cut off the tail and discard.


  • Next, remove the wishbone.


 Here's an instructional video on how to remove it.

 What I do is sit the bird on it's butt, open the neck and feel for the wishbone with my fingers. 
Once I feel it, I take my knife and scrape up against it to gently remove the meat that's covering it. 
When the bone is about 75% of the way exposed, I just run my fingers along the bone to remove any excess meat and repeat on the next side. 
Once it's exposed, I grab the tip of the wishbone and pull it out. 
Don't worry if it breaks on you, just take it out.


  • Once the wishbone is out, throw the wishbone in with the mirepoix.
  • Continue prepping the bird by cutting off the wing. ATTENTION: Don't do what I did and cut off the WHOLE WING Leave the drumette part attached. Throw the wing and tip in with the mirepoix as well.

See the part over to the far right-->> ??? Yeah. Leave that^ on the chicken.

....like so.


  • The next thing you want to do is rub your fingers right under the skin of the breast to make room for the butter you're about to shove in there!


  • Now, take a glob of the butter mixture and shove it up under the breast skin. 


  • Once you get a good amount under there, use your thumb to push and evenly distribute the butter throughout the whole breast; repeat on other side. You can even try to get some butter in between the thighs for additional seasoning. When you feel as though you've stuffed enough butter in your bird, feel free to rub the rest of it on the outside. If you have none left, mix up some salt, pepper and curry powder to rub on it. 

The reason you rub the butter under the skin is to provide moisture and additional flavoring to the breast. Knowing that this is usually the driest meat on the bird, the butter will baste the breasts in conjunction with the fat in the skin to give in more moisture.

It looks kinda crazy, but it's gonna taste AWESOME!
  • Stuff your chicken with the aromatics you set aside earlier.

  • Finally, truss  your chicken, place it on your mirepoix and bake it at 350 degrees F, uncovered for 1 1/2 hours, or until the thigh meat reads 175 degrees F.


I don't have a pic of the final result (because they freakin ATTACKED it) but it was DELICIOUS! I hope you enjoy!!

P.S. Do NOT Consume the aromatics you stuffed inside of the bird. 

Thursday, July 26, 2012

I DID THURSDAY'S WORKOUT FOR YOU GUYS!!

I woke up this morning and was like, "Hmm, I feel like making a workout video," ESPECIALLY since I've been neglecting my poor YouTube subscribers after not posting videos for YEARS and deleting the videos I used to have up there..it's all love though! =D

So check it out you guys..I worked freakin HARD on this video!! For HOURS!! HOURS!!!!!!!!
Here's the link to the Thursday Workout that I'm talking about..
ENJOY!!


Wednesday, July 25, 2012

Why I do not like fast food, AT ALL.

This post is a very STRONG opinion. 


I don't know how many of you have actually watched the documentary, "Super Size Me" by Morgan Spurlock, but it really disgusted me when I saw it. This man ate McDonald's 3x a day for 30 days straight and as a result, gained 24 1/2 lbs, had a 13% BMI increase, fat accumulation in his liver and steady stream of mood swings and other physical malfunctions. It took him 14 MONTHS to lose the weight it had only taken him 1 month to gain!! And even after that movie made it clear to the nation of what people are doing to their bodies DAILY, our country still continues to produce and promote things like the Bacon Sundae (Burger King) and would rather buy processed foods packed with salt and preservatives as opposed of making them from scratch. 

The bottom line says: The other 85% is meat filler  cleansed with ammonia
which causes stomach and intestinal cancers.
Eating fast food makes me feel sluggish, makes me flegmy, and overall is just unsatisfying. I remember when I first came back from school for Christmas and my mom stopped at McDonald's to eat and I was so hesitant about ordering ANYTHING because of the stories my chefs had told us. I just simply got a McDouble and small fries and it was honestly, disgusting. I could taste every preservative in the fries...I could taste every ounce of sugar in the ketchup...so I just stopped eating.


Although fast food is cheap and easy, you have to realize that the ONLY reason why it's cheap is because it's cheap product. Do you REALLY think that they use ACTUAL Pork rib meat for the McRib? Do you honestly believe they use prime cuts of beef to grind to make those little brownish/grey patties?? And DON'T GET ME STARTED on Chicken Nuggets....

Being a college student, I understand the need for food you can just throw in your mouth and go, but you gotta realize that after you throw that processed meat patty slathered in ketchup in between two sesame seed buns..that it's doing horrible things to your body. 

Now that I have more knowledge about food and the food industry, I always find it hard to believe that people would rather have people cooking for them rather than cooking for themselves. The people behind the counter don't care about your health or your well being, they're only doing their jobs- serving their billions of customers. But when you sit back and think about all of the disgusting preservatives, additives, meat filler and pesticides you're consuming just on that one burger ALONE, you'll find yourself having a change of heart. 
I mean, look at the news..McDonald's JUST announced in February of this year that they're going to "end the use of pink slime in their burgers," but how many decades has McDonald's been doing this?? How many years have these corporations been pumping this disgusting additive into our food without us even knowing it? It's a shame that the ONLY reason why they're stopping is because they've been exposed and they don't want to lose their customer base! I find news like this extremely disturbing because even though they had that light shone on them about the pink slime, people still continue to consume their food without giving it a second thought. 

I have a question for you guys....
Why do fast food chains have such a strong hold on us as a country?
Why is it that even when the disgusting truth is exposed to us, we just shrug it off as if it's no big deal?
Why don't we believe that these corporations would rather pump their food full of artificial filler and make more profit, than give us the real thing?
Why are we so gullible??

I have a video that I just recently watched on YouTube that was pretty unsettling to me...


If you wached it, you'll see why it disturbs me... 

It's a shame that we're so wired to eating these things that we don't even care what they're made of, let alone what they're doing to us. It's actually coming to a point where a kid will know the taste of a chicken nugget before they know what spinach tastes like. 
We all need to learn that food in it's natural form will ALWAYS be better for us than food from a package. It doesn't matter if it says "Low fat," "High in fiber," or "diet" on the label, if it isn't from God's green Earth, it's not supposed to be in your body. 
It's that simple folks. 

Much love.

Monday, June 11, 2012

::Personal Achievements:: I finally mastered my rolled omelet!

So I was watching one of the old seasons of "Worst Cooks in America" on demand, and one of their challenges was  to make a rolled omelet. Nobody knows this, but omelets are the absolute ONE thing I can NEVER cook perfectly..until today! Usually when I make an omelet it'd be overcooked on the outside and undercooked on the inside. It'd look more like a brown enchilada than an omelet...hahaha!
Watching the show, I was inspired to step my game up because here I am, this chick in culinary school, and I can't even make an omelet properly?? Sad stuff. lmao
I felt like I was bein showed up by those people on that show, so I felt as though I had to prove myself..to myself!

Aight, so..I had to take a picture of this and tell you this story right quick...
This was the craziest mess I'd ever seen in my life..lol
There I was, beginning to to make my omelet, and I proceeded to crack open my eggs. 
The first one cracked open just fine, but the second one was pretty heavy.....so I'm sittin there crackin it on the side of the bowl and I was in my head thinking, "Why does this egg feel like this??"I try to crack it open and was surprised to find that my egg was frozen.o_o
The fridge was up too high and the second carton of eggs I had in the fridge had alll frozen...so this omelet is ultimately a two-white-one-yolk omelet because the yolk was SOLID. 
 
Anyway...
 
Look at me tryna be healthy..^,^ *proud face*

I know that you guys probably don't care and are like.."It's just an omelet," but you don't understand how much of an milestone this is for me! I felt so proud of myself that I just wanted to share it with the world!!
Thanks for reading guys!

Friday, June 8, 2012

Yum Yums: Banana Fritters Pictorial!

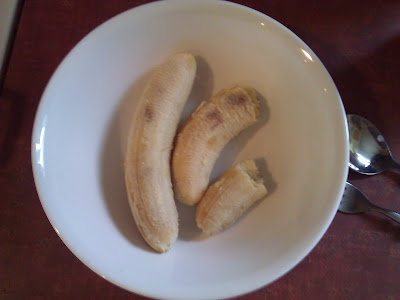
This recipe is for the ones who leave bananas there to rot cause they think they've gone bad cause they're all brown and stuff...yeah. This recipe is for you. I had these two bananas left over that I didn't use for the banana cake I made the other day, and they were just sitting there gettin all brown and sad so I decided to take them and make fritters!
I must warn you, I'm not really a "measurer"..I kinda just go off of my eye. I pretty much know this by heart because my grandma use to make them all the time...BUT I do have a recipe for you guys to follow so, HERE WE GO!

What you'll need :
  • 2-3 Bananas
  • 2 tsp. Vanilla Extract
  • 1 tsp. Ground Cinnamon
  • 1/2 C. Sugar *I used cane sugar but regular sugar should be just fine*
  • 1 tbsp. Baking Powder
  • 1 tsp. Salt
  • 1 egg *optional*
  • 3 C. Veg oil for frying
 
Tools Needed
  • Deep pan
  • Fork
  • Spoon
  • Bowl
  • Measuring spoons
  • Measuring Cups
  • Slotted spoon
  • A plate w/ paper towels or a brown paper bag for draining.


 Directions:

 First, you want to heat the oil over medium-high heat. You want the oil to reach at least 325 - 350degrees F. for the fritters to fry properly..

Next, you want to peel your bananas and place them in the bowl. Now, at this point, I like to just add everything but the flour and baking powder before I mash them to incorporate more flavor...

...take fork and mash until no large pieces are left.

Then you want to add the baking powder and stir in...

...and lastly the flour. I add the flour a lil bit at a time until it reaches the desired consistency.


I like it to be thick enough to slide off the fork, but isn't runny. It needs to be the consistency of..oatmeal.
See how it sticks to the fork?
Next, take a considerable amount of the mixture into your spoon, about 3/4 of the way full...

...hold the spoon directly over the heat and let the mixture slide off the spoon into the oil.
Let it fry for about 1 minute to set and then, using your slotted spoon, scrape the bottom of the fritter so that it's not stuck to the bottom of the pan. Let it fry for another 2-3 minutes.

 
Using your slotted spoon, kinda lift the fritter and peek at the bottom to see if it's golden brown. If it is, flip it over. If not, let it fry a lil bit longer but make sure you don't burn it.
This is the color you're lookin for...
 Once the other side is brown as well, you want to take your slotted spoon, remove the fritter, and place it on your paper towels to drain.


 We have a lot of paper bags lying around from Shoprite and the Chinese food store, so I like to use them to help sop up the oil when I'm frying foods. 

I tear it in half and place the top half into the bottom of the bag, and line it with a few napkins and/or paper towels.
It's simple AND cheap. Another thing I use is news paper w/ a couple paper towels on top.

Now, some people like to dust the fritters with powdered sugar, but they don't usually last long enough around here to require all of that. lol 

The only thing left to do now is DIG IN! *once they've cooled, of course*

ENJOY!
=D